

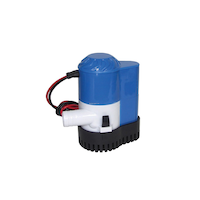
Attwood
Pompe de cale automatique
#079-3514-4
79,99 $
Malheureusement, cet article ne fait plus partie de l’assortiment du magasin que vous avez sélectionné et les magasins de la région.
Ces produits similaires présentés ci-dessous pourraient vous intéresser.Articles de remplacement disponibles


À l'attention des personnes résidant au Québec: pour obtenir des renseignements sur l'entretien et la réparation, cliquez ici.
Objets similaires


Produit Détails
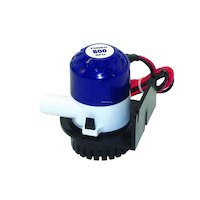
Pompe de cale automatique dotée d'un tuyau de 36 po de long en cuivre étamé de calibre 16
Fil maté empêche l'eau de s'infiltrer dans la gaine isolante
Pour les bateaux d'environ 17 pi
500 gal/h à débit ouvert; 350 gal/h à la tête de 3,3 pi
Tire seulement 1,5 A à débit ouvert
Flexible de 3/4 po
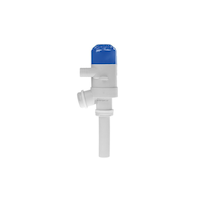
| Numéro de modèle de l’article | 4505-7 |
|---|---|
| Capacité de la pompe (L/h) | 1,00 L/h |
| Capacité de la pompe (gal/h) | 0,26 gal (É.-U.)/h |
| Certifications | Conforme aux normes ABYC, Certifié CE, Certifié ISO, Approuvé par la Garde côtière des États-Unis |
| Fonctionnalités avancées | Sans fonctionnalités avancées |
| Hauteur une fois assemblé (pi) | 0,66 pi |
| Hauteur une fois assemblé (po) | 7,87 po |
| Largeur une fois assemblé (cm) | 17,78 cm |
| Largeur une fois assemblé (mm) | 177,80 mm |
| Largeur une fois assemblé (po) | 7,00 po |
| Liste d’accessoires | Aucun accessoire inclus |
|---|---|
| Longueur du fil de plomb (cm) | 1,00 cm |
| Longueur du fil de plomb (mm) | 10,00 mm |
| Longueur du fil de plomb (po) | 0,39 po |
| Longueur une fois assemblé (cm) | 8,89 cm |
| Longueur une fois assemblé (pi) | 0,29 pi |
| Longueur une fois assemblé (po) | 3,50 po |
| Matériau principal | En plastique |
| Nombre de pièces | 1 |
| Poids une fois assemblé (kg) | 0,66 kg |
| Poids une fois assemblé (lb) | 1,45 lb |
| Profondeur une fois assemblé (cm) | 19,99 cm |
| Raccord cannelé (mm) | 1,00 mm |
| Raccord cannelé (po) | 0,04 po |
| Source(s) d'alimentation | Électrique |
| Taille de fusible (A) | 1 A |
| Température de service maximale (°C) | 1,00 °C |
| Température de service maximale (°F) | 33,80 °F |
| Tension (V) | 12 V |
| Type de pompe | Centrifuge |
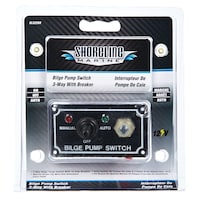
| Type d’interrupteur | Automatique |
| Utilisations du produit | Humide |
Garantie:
- Si cet article est défectueux, il est couvert par la garantie du fabricant. Dans le cas où aucune garantie n'est indiquée, cet article est couvert par une garantie de un an honorée dans tout magasin Canadian Tire.
Commande en ligne
- Le ramassage est gratuit dans la plupart des magasins (certains magasins exigent un montant minimum de commande avant taxes).
- Les tarifs d’expédition dépendent de la taille et du poids des articles, ainsi que de la distance entre l’adresse de livraison et le magasin.
- La livraison le jour même coûte 9,99 $ par commande.
- Informations sur une commande en ligne
Retours
- La plupart des articles peuvent être retournés ou échangés dans tous les magasins Canadian Tire dans les 90 jours suivant l’achat.
- Certains articles ne sont pas remboursables ni échangeables.
- La politique de retour décrite ci-dessus peut ne pas s’appliquer à l’article que vous consultez présentement. Pour obtenir tous les détails et connaître les critères d’admissibilité, veuillez consulter notre Politique de retour pour connaître les exceptions.
Acheter des produits connexes
- Offres hebdomadaires
- Les clients ont aussi consulté
- Vers les produits tendances
- Plus de cette marque
Offres hebdo


Points saillants de l'evaluation
Évaluations
Filtrer les avis
- installation
- achat
- usure normale
- instructions
- garantie
- retours
- la satisfaction
Cote
Paramètre régional
1 à 5 sur 7 commentaire.
1 – 5 sur 7 commentaire
Les plus récents
1 étoile(s) sur 5.
TOTAL GRABAGE - DO NOT WASTE YOUR MONEY
il y a 5 ans
I bought this pump in June 2020. Today is August 19 2020. I just got to my cabin and found my 17' Aluminum boat 1/2 sunk at the dock. IT rained a lot in the last 2 weeks and I had it connected to a high end marine battery. I tested the battery and it is still fully charged. The motor is either fried or shorted. Either way I will never buy a Five Oceans product again.
Non, Je ne recommande pas ce produit.
Utile?
1 étoile(s) sur 5.
Junk, Junk, JUNK!
il y a 5 ans
I bought a 17-foot aluminum boat and this 'Sahara' pump was already installed. It worked for the first summer, then quit. I found the same model and bought one because the base was already attached to the boat... easy, peasey. I installed the second pump and it worked for a season and quit, just like the first one. Stupid me... I bought a third one and snapped it into the base. You guessed it... it QUIT working like the first two did. DO NO BUY this product!
Non, Je ne recommande pas ce produit.
Utile?
5 étoile(s) sur 5.
marche super bien et facile a pauser
il y a 6 ans
J'ai installé cette pompe sur mon bateau et j'en suis bien content
Oui, Je recommande ce produit.
Utile?
1 étoile(s) sur 5.
Auto bilge pump
il y a 7 ans
6 months old and auto function stopped working, It was a dry summer so it likely ran on auto 2 -3 times, when you lift the float there is nothing, but on manual it works.
Utile?
1 étoile(s) sur 5.
Better off with a bailer
il y a 7 ans
On the rare occasions that the automatic float switch actually works, literally ANY piece of debris will clog up the impeller and reduce it to little more than a trickle all while draining your battery. I hate this product and will most likely rip it out and smash it with a hammer as my patience is wearing thin.
Non, Je ne recommande pas ce produit.
Utile?
1 – 5 sur 7 commentaire
Questions
Commencez à taper votre question et nous vérifierons si elle a déjà été posée et répondue.
1 - 3 sur 3 questions
Réponses les plus utiles
Q : is this 12 or 24 volt
il y a 13 ans2 Réponses
- Traduire avec GoogleR : 12 Voltil y a 12 ansUtile?
Q : what are the dimensions of the pump and how do you mount it in place?
il y a 11 ans1 Réponse
- Traduire avec GoogleR : The dimensions are: 4" H x 51/2" L x 4 1/4" W The mounting instructions are included with the pump. PUMP MOUNTING INSTRUCTIONS WARNING: Remove the pump mounting base (See Figure 3). Failure to do this prevents the pump from starting when water is present. 1. Make sure the hull thickness is at least 1/2" thick. If not, place a block of 1/2" marine plywood (slightly larger than pump base) in the lowest part of the bilge. Be sure that the pump cover can be removed for cleaning in this position. Glue the plywood to the hull with a waterproof adhesive (epoxy, silicone adhesive, or fi berglass resin). See Figure 1. 2. Position the pump in the lowest part of the bilge on a fl at, level surface (on the plywood block if it has been installed) with the outlet pointing toward the transom. 3. Be sure outlet nozzle is level. If pointed upward or downward, an airlock may form in the pump. (See Figure 1.) 4. The fl oat end of the pump must be level with or above the pump end (See Figure 1). This prevents the pump from running out of water while the fl oat is still high enough to activate the pump. 5. Mark location of the three (3) mounting holes with a pencil or scribe. WARNING: When drilling holes do not drill through the hull! 6. Carefully drill two 1/8" diameter pilot holes in marked area and drive a screw in each hole. 7. Slide hose clamps (one to clamp hose to the pump, the other for the thru-hull connector) over end of the hose. Force hose over the discharge nozzle of the pump. Install clamp. 8. Route hose on an upward incline to the thru-hull connector. Avoid dips in hose that can trap water and airlock the pump. Avoid putting excess tension on hose, which can damage the pump outlet. 9. Force the hose over the thru-hull barbs and clamp into place. THRU-HULL CONNECTOR INSTRUCTIONS If no thru-hull connector exists, choose a location for the fi tting. 1. Position thru-hull fi ttings at least 12" above the water line to prevent water from coming back into the hull. On sailboats, mount the thru-hull high enough on the center of the transom to be above the water line at all times. 2. Place fi tting, if possible, on the same side as the steering wheel so the driver can see discharge of water when the pump is working properly. 3. Drill hole to match outside diameter of the thru-hull connector thread. 4. Place a small bead of suitable marine sealant around inside of the thru-hull connector fl ange. WARNING: Do not allow sealants containing acetic acid (smells like vinegar) such as silicone rubber sealant to contact the plastic pump housing or thru-hull connector. Such sealants can attack the plastic, causing the pump housing to crack, resulting in pump failure. 5. Insert thru-hull connector through the hole and tighten to hold the thru-hull connector fi rmly in place. CAUTION: Do not overtighten the nut. WIRING INSTRUCTIONS WARNING: Be certain that power source is 12-volt D.C. Higher voltage will damage the pump. 1. Using the full length of wire provided (and additional wire if necessary), connect wires to the pump as shown in the diagram. (See Figure 2.) 2. Route wires out of the way and secure them to the bulkhead to avoid pulling. 3. Using butt connectors sized for 16-gauge wire, splice fuse holder into positive lead (brown) between the battery and switch. Position fuse holder in a location that is easily accessible for changing fuses. IMPORTANT: Use fuses of the proper amperage (See Specifi cation Chart at top of sheet). WARNING: FAILURE TO PROPERLY FUSE AND MAKE THE APPROPRIATE WATERPROOF CONNECTIONS WILL VOID THE PRODUCT WARRANTY. 4. Install a Three-Way Switch (Attwood No. 7615A) that allows for automatic or manual switching modes. 5. Turn the pump on and twist the Test Knob clockwise to check operation. Feed water into the pump. If output appears to be too low, check the wire connections. Reversed connections result in opposite impeller rotation that drastically reduces capacity and can cause premature pump failure. CARE AND MAINTENANCE Occasionally check your pump to be certain debris is not jamming the impeller and/or fl oat within the housing. Use the test knob by rotating in a clockwise direction. Careful attention will guarantee outstanding pump performance. To clean the water chamber, remove pump housing from the mounting base by pressing in tabs on sides. Lift the pump housing away. (See Figure 3.) To clean the impeller, remove the impeller guard screw and lift the impeller guard. Remove all debris that has accumulated in pump chamber and around the impeller. Ensure that all debris is removed from strainer slots around the pump base. Inspect the impeller to ensure that it is fi rmly attached to shaft and is not cracked or broken. Replace impeller guard, screw, and pump housing on base. Be certain that all tabs are fully engaged. Periodically check the electrical connections to ensure they are water-resistant and mounted high and dry. Do not use household cleaners on the pump because many of them may damage the pump materials.il y a 11 ansUtile?
Q : Is this one has a float switch, which may let the pump run when water level are up to certain level.
il y a 11 ans1 Réponse
- Traduire avec GoogleR : Yes this product has the automatic float switch in the base of the pump. The switch is a float that is lifted when the water level rises and then turns the mechanical switch into the on position. When the water level drops the switch moves to the off position and turns the pump off.il y a 11 ansUtile?


