Deals
New & Featured
Departments
- Automotive
- ATVs, Snowmobiles, Motorcycles Parts & Accessories
- ATVs, Snowmobiles, Motorcycles Parts & Accessories Sales
- ATVs, Snowmobiles, Motorcycles Parts & Accessories Clearance
- ATV & UTV Parts & Accessories
- Motorcycle Parts & Accessories
- Snowmobile Parts & Accessories
- Audio & Electronics
- Auto Body Repair, Paints & Accessories
- Auto Lighting
- Auto Parts
- Auto Body Parts
- Brakes
- Drivetrain & Transmission
- Electrical & Wiring
- Emission & Exhaust Systems
- Engine & Ignition
- Filters & PCV Valves
- Fuel Delivery
- Heating, A/C & Engine Cooling
- Antifreeze & Coolant System Additives & Chemicals
- Cabin Air Filters
- Engine Cooling Parts
- Engine Heaters
- Heating & A/C Parts
- Heating, A/C & Engine Cooling Tools
- Refrigerants & A/C Additives
- Sensors, Switches & Relays
- Oil Delivery Parts
- Performance Parts
- Starters & Alternators
- Steering & Alignment
- Suspension Parts
- Wiper Blades & Parts
- Auto Shelters
- Auto Tools
- Auto Body Repair Tools
- Brake System Tools
- Diagnostic & Testing Tools
- Drivetrain & Transmission Tools
- Electrical Tools & Kits
- Fuel System Tools
- Garage & Auto Shop Storage & Equipment
- General Service Tools
- Grease & Lubrication Tools
- Heating, A/C & Engine Cooling Tools
- Oil Change Tools & Accessories
- Repair Manuals
- Steering, Suspension & Alignment Tools
- Tire & Wheel Tools
- Batteries, Maintenance & Accessories
- Auto & Specialty Batteries
- Battery Booster Packs & Jump Starters
- Battery Cables & Hold Downs
- Battery Chargers
- Battery Terminals
- Battery Testers & Tools
- Booster Cables
- EV Chargers
- Power Inverters
- Car Detailing & Care Products
- Car Safety & Security
- Exterior Accessories
- Interior Accessories
- 12V Car Chargers & Plug-In Accessories
- Car Air Fresheners
- Car Safety & Security
- Car Seats
- Car Warmers
- Car Window Shades & Visors
- Car Window Tint
- Floor Mats & Liners
- Interior Car Mirrors
- Interior Car Organizers
- Interior Dress-Up Accessories
- Keychains
- Seat Covers & Cushions
- Steering Wheel Covers
- Oils, Fluids, Additives & Chemicals
- Antifreeze & Coolant System Additives & Chemicals
- Brake & Power Steering Fluids & Additives
- Diesel Fluids
- Engine Oils & Additives
- Fuel System Additives & Cleaners
- Grease, Gear Oils & Lubricants
- Oil Change Tools & Accessories
- Refrigerants & A/C Additives
- Stop Leaks
- Transmission Fluids & Additives
- Windshield Washer Fluids
- RV Parts & Accessories
- RV Electrical Accessories
- RV Exterior
- RV Fresh Water Accessories
- RV Interior
- RV Leveling & Stabilization
- RV Lighting
- RV Maintenance
- RV Plumbing & Sanitation
- Tires & Wheels
- Trailers & Towing Accessories
- Truck Accessories
- Cargo Management
- Exhaust Systems
- Exterior Truck Accessories
- Floor Mats & Liners
- Jeep Accessories
- LED Light Bars
- Light Pods & Utility Lights
- Mounts & Accessories
- Mud Flaps & Splash Guards
- Performance Air Filters
- Running Boards & Steps
- Seat Covers & Cushions
- Snow Plows, Mounts & Accessories
- Tonneau Covers
- Trailers & Towing Accessories
- ATVs, Snowmobiles, Motorcycles Parts & Accessories
- Home
- Appliances
- Hair Care
- Irons & Steamers
- Kitchen Appliances
- Blenders & Juicers
- Breadmakers
- Carbonated Water Makers & Accessories
- Coffee Grinders
- Coffee Makers
- Coffee, Espresso & Tea
- Cookers
- Espresso Machines & Makers
- Food Dehydrators
- Food Mixers & Accessories
- Food Processors & Choppers
- Fryers
- Hot Plates & Food Warmers
- Ice Makers
- Indoor Grilling
- Kettles
- Meat Grinders & Slicers
- Microwaves
- Popcorn Makers
- Toasters
- Waffle Makers
- Portable Dishwashers & Replacement Parts
- Range Hoods & Accessories
- Refrigerators & Beverage Coolers
- Sewing Machines
- Shavers, Trimmers & Hair Removal
- Vacuum Cleaners
- Water Coolers
- Bath
- Bath Mats & Rugs
- Bathroom Accessories
- Bathroom Exhaust Fans & Accessories
- Bathroom Hardware
- Bathroom Storage & Organization
- Bathroom Vanities
- Bathtubs, Showers & Accessories
- Hand & Bath Towels
- Beauty, Health & Wellness
- Bath, Body & Skin Care
- Fitness & Exercise
- Fitness & Training Recovery
- Hair Care
- Health Care Devices & Accessibility Equipment
- Heating, Cooling & Air Quality
- Oral Care
- Protective Face Masks & Coverings
- Shavers, Trimmers & Hair Removal
- Spa, Massage & Aromatherapy
- Sun Protection.
- Heating, Cooling & Air Quality
- Home Decor
- Home Electronics
- Home Furniture
- Baby Furniture
- Bedroom Furniture
- Entryway Furniture
- Kitchen & Dining Room Furniture
- Living Room Furniture
- Office Furniture
- Rugs & Flooring
- Toddler & Kids Furniture
- Window Treatments
- Home Safety & Security
- Household & Cleaning Supplies
- Air Fresheners
- Cleaners
- Cleaning Tools
- Dish Cleaning
- Drain Cleaners
- Floor Cleaning
- Garbage Cans & Bags
- Laundry Supplies
- Paper Products
- Plungers
- Vacuum Cleaners
- Kitchenware
- Bakeware
- Coffee, Espresso & Tea
- Cookware
- Dining & Entertaining
- Food Organizers
- Kitchen Appliances
- Blenders & Juicers
- Breadmakers
- Carbonated Water Makers & Accessories
- Coffee Grinders
- Coffee Makers
- Coffee, Espresso & Tea
- Cookers
- Espresso Machines & Makers
- Food Dehydrators
- Food Mixers & Accessories
- Food Processors & Choppers
- Fryers
- Hot Plates & Food Warmers
- Ice Makers
- Indoor Grilling
- Kettles
- Meat Grinders & Slicers
- Microwaves
- Popcorn Makers
- Toasters
- Waffle Makers
- Kitchen Linens
- Kitchen Storage & Organization
- Kitchen Tools & Gadgets
- Knives & Cutting Accessories
- Portable Drinkware
- Lighting
- Moving Supplies
- Office & School Supplies
- Paints & Stains
- Party City
- Bakeware
- Balloons & Accessories
- Birthday Invitations & Valentine's Day Cards
- Gift Wrapping Supplies
- Household & Cleaning Supplies
- Party Decorations
- Party Favours
- Arts & Crafts Supplies
- Bags
- Bubbles & Bubble Toys
- Cups, Containers & Treat Boxes
- Favour Ties, Tags & Charms
- Giveaway Toys
- Glow Sticks
- Jewelry
- Party & Birthday Hats
- Party Favour Gift Sets
- Pins, Buttons & Patches
- Stationery
- Stickers
- Temporary Tattoos
- Trophies & Ribbons
- Wands
- Water Balloons
- Water Blasters & Soakers
- Whistle & Noisemakers
- Tableware
- Toys & Games
- Action Figures
- Arts & Crafts Supplies
- Board Games & Puzzles
- Building Sets & Blocks
- Card Games
- Collectibles
- Dolls & Playsets
- Games Room
- Kids Electronics
- Pretend Play
- Remote Control Vehicles
- Science & Educational Toys
- Stuffed & Plush Animals
- Toddler & Preschool Toys
- Toy Blasters
- Toy Cars, Trains & Race Tracks
- Toy Storage
- Sinks, Faucets & Fixtures
- Bathroom Sinks & Faucets
- Bathroom Vanities
- Bathtubs, Showers & Accessories
- Kitchen Sinks & Faucets
- Laundry Tubs & Faucets
- Shower Wall Panels
- Showerheads & Hand Showers
- Toilets & Accessories
- Smart Home
- Snacks & Beverages
- Storage & Organization
- Baskets
- Bathroom Storage & Organization
- Closet Storage & Organization
- Garage Organization & Tool Storage
- Garage Door Openers & Hardware
- Garage Stools
- Garage Storage Cabinets
- Garage Storage Shelves & Racks
- Garage Wall & Ceiling Organization
- Plastic Storage Containers & Totes
- Portable Work Lights
- Tool Bags, Boxes & Organizers
- Tool Belts & Aprons
- Tool Chests, Cabinets & Accessories
- Tool Pouches & Holders
- Utility & Tool Carts
- Workbenches & Workstands
- Hanging Hooks
- Kitchen Storage & Organization
- Laundry Storage & Organization
- Shelving & Racks
- Shoe Racks & Storage
- Shopping Carts & Bags
- Storage Bins
- Storage Drawers & Carts
- Storage Furniture
- Toy Storage
- Vacuum Storage Bags
- Appliances
- Outdoor Living
- Backyard Pools & Supplies.
- Christmas
- Christmas Candies & Gift Sets
- Christmas Decorations & Ornaments
- Christmas Entertaining
- Christmas Lights
- Christmas Icicle Lights
- Christmas Inflatables
- Christmas Lawn Décor
- Christmas Light Clips & Accessories
- Christmas Light Projectors
- Christmas Lit Signs & Lanterns
- Christmas Net Lights
- Christmas Pathway Lights
- Christmas Rope Lights
- Christmas Solar Lights
- Christmas String Lights
- Replacement Christmas Bulbs
- Smart Christmas Lights & Decor
- Christmas Stockings & Accessories
- Christmas Storage
- Christmas Trees & Accessories
- Christmas Wreaths & Garlands
- Festive Pets
- Gift Wrapping & Accessories
- Indoor Christmas Décor
- Outdoor Christmas Décor
- Pyjamas & Robes
- Gazebos, Pergolas & Canopies
- Generators & Accessories
- Lawn & Garden
- Mosquito, Insect & Pest Control
- Outdoor Cooking & BBQs
- Outdoor Dining & Entertaining
- Outdoor Heating
- Outdoor Lighting
- Outdoor Power Equipment.
- Chainsaws
- Grass Trimmers
- Hedge Trimmers
- Lawn & Garden Batteries.
- Lawn Mowers
- Lawn Tractors, Riding Mowers & Attachments
- Leaf Blowers & Accessories
- Log Splitters, Wood Chippers & Shredders
- Outdoor Power Tool Accessories
- Pressure Washers, Parts & Accessories
- Snowblowers.
- Tillers & Cultivators
- Outdoor Recreation
- Outdoor Storage
- Patio Furniture & Décor
- Snow Removal Equipment & Tools
- Solar Power Systems
- Tools & Hardware
- Air Tools & Compressors
- Electrical
- Conduits & Fittings
- Cord Covers & Cable Organizers
- Dimmers, Switches & Timers
- Electrical Boxes
- Electrical Motor Parts
- Electrical Plugs, Connectors & Adapters
- Electrical Tools & Accessories
- Extension Cords
- Fuses, Breakers & Panel Boxes
- Household Batteries
- Power Bars & Surge Protectors
- Wall Plates & Outlet Covers
- Wall Receptacles
- Weatherproof Electrical Fittings
- Wiring & Cables
- Exterior Repair & Maintenance Supplies
- Garage Organization & Tool Storage
- Garage Door Openers & Hardware
- Garage Stools
- Garage Storage Cabinets
- Garage Storage Shelves & Racks
- Garage Wall & Ceiling Organization
- Plastic Storage Containers & Totes
- Portable Work Lights
- Tool Bags, Boxes & Organizers
- Tool Belts & Aprons
- Tool Chests, Cabinets & Accessories
- Tool Pouches & Holders
- Utility & Tool Carts
- Workbenches & Workstands
- Hand Tools
- Hardware
- Ladders & Scaffolding
- Paints & Stains
- Plumbing
- Power Tool Accessories
- Power Tools
- Buffers & Polishers
- Combo Kits
- Drill Presses & Lathes
- Drills & Accessories
- Grinders
- Heat Guns
- Impact Drivers
- Impact Wrenches
- Nailers & Staplers
- Oscillating Tools
- Planers & Joiners
- Power Tool Accessories
- Rotary Tools
- Routers
- Sanders
- Saws
- Specialty Power Tools
- Shop Vacuums
- Sinks, Faucets & Fixtures
- Bathroom Sinks & Faucets
- Bathroom Vanities
- Bathtubs, Showers & Accessories
- Kitchen Sinks & Faucets
- Laundry Tubs & Faucets
- Shower Wall Panels
- Showerheads & Hand Showers
- Toilets & Accessories
- Welding & Soldering Tools
- Work Wear & Safety Gear
- Sports & Recreation
- Bikes & Accessories
- Camping & Hiking
- Clothing, Shoes & Accessories
- Clothing
- Fan Zone
- Hats, Gloves & Accessories
- Hunting Clothes & Apparel
- Mosquito & Bug Net Gear
- Pyjamas & Robes
- Rain Gear
- Shoes & Boots
- Snowmobile Riding Gear
- Wetsuits & Water Shoes
- Winter Apparel
- Work Wear & Safety Gear
- Fishing
- Fitness & Exercise
- Games Room
- Golf & Precision Sports
- Hunting
- Luggage & Suitcases
- Outdoor Recreation
- Racquet Sports
- Team Sports
- Baseball & Softball
- Basketball
- Cricket
- Curling
- Fan Zone
- Football
- Hockey
- Lacrosse
- Soccer
- Volleyball
- Water Sports & Boating
- Boating & Marine
- Canoe & Kayak Accessories
- Canoe, Kayak & Stand Up Paddle Board Carriers
- Kayaks & Canoes
- Life Jackets/PFDs.
- Paddles, Oars & Accessories
- Stand Up Paddle Boards & Accessories
- Sun Protection.
- Swimming
- Tow Ropes & Accessories
- Towable Tubes & Accessories
- Wakeboards & Water Skis
- Water Toys & Floats.
- Wetsuits & Water Shoes
- Winter Sports
- Curling
- Hockey
- Ice Skates
- Sledding
- Snow Goggles
- Snow Helmets
- Snowboards
- Snowshoeing
- Winter Apparel
- Tires & Wheels
- Kitchen & Dining
- Bakeware
- Coffee, Espresso & Tea
- Cookware
- Dining & Entertaining
- Food Organizers
- Kitchen Appliances
- Blenders & Juicers
- Breadmakers
- Carbonated Water Makers & Accessories
- Coffee Grinders
- Coffee Makers
- Coffee, Espresso & Tea
- Cookers
- Espresso Machines & Makers
- Food Dehydrators
- Food Mixers & Accessories
- Food Processors & Choppers
- Fryers
- Hot Plates & Food Warmers
- Ice Makers
- Indoor Grilling
- Kettles
- Meat Grinders & Slicers
- Microwaves
- Popcorn Makers
- Toasters
- Waffle Makers
- Kitchen Linens
- Kitchen Storage & Organization
- Kitchen Tools & Gadgets
- Knives & Cutting Accessories
- Portable Drinkware
- Vacuum Cleaners
- Storage & Organization
- Baskets
- Bathroom Storage & Organization
- Closet Storage & Organization
- Garage Organization & Tool Storage
- Garage Door Openers & Hardware
- Garage Stools
- Garage Storage Cabinets
- Garage Storage Shelves & Racks
- Garage Wall & Ceiling Organization
- Plastic Storage Containers & Totes
- Portable Work Lights
- Tool Bags, Boxes & Organizers
- Tool Belts & Aprons
- Tool Chests, Cabinets & Accessories
- Tool Pouches & Holders
- Utility & Tool Carts
- Workbenches & Workstands
- Hanging Hooks
- Kitchen Storage & Organization
- Laundry Storage & Organization
- Shelving & Racks
- Shoe Racks & Storage
- Shopping Carts & Bags
- Storage Bins
- Storage Drawers & Carts
- Storage Furniture
- Toy Storage
- Vacuum Storage Bags
- Toys & Games
- Action Figures
- Arts & Crafts Supplies
- Board Games & Puzzles
- Building Sets & Blocks
- Card Games
- Collectibles
- Dolls & Playsets
- Games Room
- Kids Electronics
- Pretend Play
- Remote Control Vehicles
- Science & Educational Toys
- Stuffed & Plush Animals
- Toddler & Preschool Toys
- Toy Blasters
- Toy Cars, Trains & Race Tracks
- Toy Storage
- Luggage & Suitcases
- Clothing, Shoes & Accessories
- Clothing
- Fan Zone
- Hats, Gloves & Accessories
- Hunting Clothes & Apparel
- Mosquito & Bug Net Gear
- Pyjamas & Robes
- Rain Gear
- Shoes & Boots
- Snowmobile Riding Gear
- Wetsuits & Water Shoes
- Winter Apparel
- Work Wear & Safety Gear
- Pet Care
- Baby
- Party City
- Bakeware
- Balloons & Accessories
- Birthday Invitations & Valentine's Day Cards
- Gift Wrapping Supplies
- Household & Cleaning Supplies
- Air Fresheners
- Cleaners
- Cleaning Tools
- Dish Cleaning
- Drain Cleaners
- Floor Cleaning
- Garbage Cans & Bags
- Laundry Supplies
- Paper Products
- Plungers
- Vacuum Cleaners
- Party Decorations
- Party Favours
- Arts & Crafts Supplies
- Bags
- Bubbles & Bubble Toys
- Cups, Containers & Treat Boxes
- Favour Ties, Tags & Charms
- Giveaway Toys
- Glow Sticks
- Jewelry
- Party & Birthday Hats
- Party Favour Gift Sets
- Pins, Buttons & Patches
- Stationery
- Stickers
- Temporary Tattoos
- Trophies & Ribbons
- Wands
- Water Balloons
- Water Blasters & Soakers
- Whistle & Noisemakers
- Tableware
- Toys & Games
- Action Figures
- Arts & Crafts Supplies
- Board Games & Puzzles
- Building Sets & Blocks
- Card Games
- Collectibles
- Dolls & Playsets
- Games Room
- Kids Electronics
- Pretend Play
- Remote Control Vehicles
- Science & Educational Toys
- Stuffed & Plush Animals
- Toddler & Preschool Toys
- Toy Blasters
- Toy Cars, Trains & Race Tracks
- Toy Storage
- Shop Canadian
- All Brands
- Sales & Clearance
- Services & Gift Cards
- Patio
- Tires
- Summer Awaits
- Party City
- Book Auto Service
This paragraph should be hidden.
How to apply driveway sealer
Your driveway is one of the first things people see when visiting your home, and rejuvenating its appearance should be done every few years. Keeping your driveway maintained can also save you money in the long run. With a few common tools and a little bit of elbow grease, you’ll have a driveway with a “just paved” look in no time.

STEP 1
Make sure to start early in the day to allow for plenty of drying time.
STEP 2
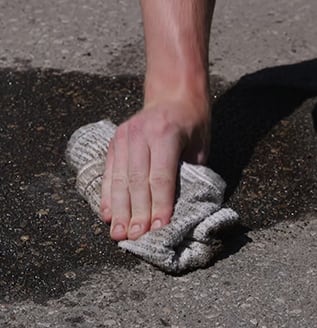
Start by cleaning the driveway and brushing off all debris. A leaf blower works well for this.

STEP 3
Clean out any grass or weeds in cracks.

STEP 4
Remove any oil spills with a cleaner and scrub with a brush.

STEP 5
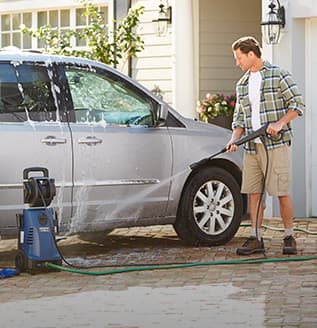
Wash the driveway. You can use a hose and stiff cleaning brush or a pressure washer with a low-pressure tip.

STEP 6
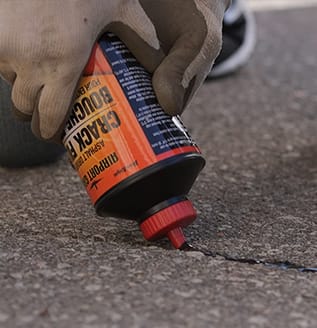
Repair any cracks.Use the trowel and broom to remove loose asphalt. Fill the cracks with the recommended repair compound and let it cure.

STEP 7
Apply the driveway sealer.

STEP 8
Set the empty pails at the end of driveway.This is to prevent cars from parking on the fresh sealer.

STEP 9
Wait for it to dry.The sealer will be dry to the touch in about 4 hours. Wait the recommended time (usually 24 – 48 hours) before driving on it.