


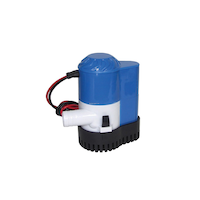
Attwood
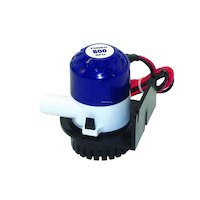
Auto Bilge Pump
#079-3514-4
$79.99
Unfortunately, this product is discontinued in your selected store and nearby stores.
You may be interested in these similar products shown below.Similar Items


Quebec residents: For information on maintenance and repair click here.
Similar Items
Product Details
Bilge pump includes 36" lengths of 16-gauge tinned copper wire
Wire is caulked to prevent water from wicking through insulation jacket
Sized for boats up to approximately 17'
500 GPH at open flow; 350 GPH at 3.3' head
Draws only 1.5A at open flow
¾" hose outlet
| Part Number | 4505-7 |
|---|---|
| Accessories List | No Accessories Included |
| Advanced Features | No Advanced Features |
| Assembled Height (cm) | 19.99 cm |
| Assembled Height (ft) | 0.66 ft |
| Assembled Height (in) | 7.87 in |
| Assembled Length (cm) | 8.89 cm |
| Assembled Length (ft) | 0.29 ft |
| Assembled Length (in) | 3.50 in |
| Assembled Weight (kg) | 0.66 kg |
| Assembled Weight (lb) | 1.45 lb |
|---|---|
| Assembled Width (cm) | 17.78 cm |
| Assembled Width (in) | 7.00 in |
| Assembled Width (mm) | 177.80 mm |
| Certifications | ABYC Compliant, CE Certified, ISO Certified, US Coast Guard Approved |
| Fuse Size (a) | 1 A |
| Hose Barb (In) | 0.04 in |
| Hose Barb (mm) | 1.00 mm |
| Maximum Operating Temperature (°C) | 1.00 °C |
| Maximum Operating Temperature (°F) | 33.80 °F |
| Number of Pieces | 1 |
| Power Source(s) | Electric |
| Primary Material | Plastic |
| Product Use(s) | Wet |
| Pump Capacity (gal/h) | 0.26 gal (US)/h |
| Pump Capacity (l/hr) | 1.00 l/h |
| Pump type | Centrifugal |
| Switch Type | Automatic |
| Voltage (V) | 12 V |
| Wire Lead Length (cm) | 1.00 cm |
| Wire Lead Length (in) | 0.39 in |
| Wire Lead Length (mm) | 10.00 mm |
Warranty
- This product carries a 1 year exchange warranty redeemable at any Canadian Tire store.
Online Ordering
- Pick Up is free at most stores (some stores require a minimum order value before tax)
- Shipping fee is based on size and weight of products and distance from address to store
- Same-Day Delivery costs $9.99 per order
- Online Ordering Information
Returns
- Most products can be returned or exchanged at any Canadian Tire store within 90 days of purchase
- Some products are non-refundable and non-exchangeable
- The return policy outlined above may not apply to the product you are currently viewing. For complete details and eligibility, please refer to our Return Policy for exceptions.
Compare Similar Products
Only Show Differences | Currently Viewing | |||||
| Ratings | ||||||
| Accessories List | No Accessories Included | No Accessories Included | Marine Grade Wiring | Marine Grade Wiring | Marine Grade Wiring | |
| Advanced Features | No Advanced Features | No Advanced Features | Compact Design | Clog-Resistant, Compact Design, Corrosion Resistant, Self-Priming, Submersible | No Advanced Features | |
| Assembled Height (cm) | 19.99 cm | 27.94 cm | 12.00 cm | 8.89 cm | 18.29 cm |


Shop Related Products
- Weekly Deals
- Customers Also Viewed
- Top Trending Products
- More From This Brand
Review Highlights
Reviews
Filter Reviews
- installation
- purchase
- satisfaction
- warranty
- wear and tear
- returns
- instructions
Rating
Locale
1 to 5 of 7 Reviews
1 – 5 of 7 Reviews
Most Recent
1 out of 5 stars.
TOTAL GRABAGE - DO NOT WASTE YOUR MONEY
5 years ago
I bought this pump in June 2020. Today is August 19 2020. I just got to my cabin and found my 17' Aluminum boat 1/2 sunk at the dock. IT rained a lot in the last 2 weeks and I had it connected to a high end marine battery. I tested the battery and it is still fully charged. The motor is either fried or shorted. Either way I will never buy a Five Oceans product again.
No, I do not recommend this product.
Helpful?
1 out of 5 stars.
Junk, Junk, JUNK!
5 years ago
I bought a 17-foot aluminum boat and this 'Sahara' pump was already installed. It worked for the first summer, then quit. I found the same model and bought one because the base was already attached to the boat... easy, peasey. I installed the second pump and it worked for a season and quit, just like the first one. Stupid me... I bought a third one and snapped it into the base. You guessed it... it QUIT working like the first two did. DO NO BUY this product!
No, I do not recommend this product.
Helpful?
5 out of 5 stars.
marche super bien et facile a pauser
6 years ago
J'ai installé cette pompe sur mon bateau et j'en suis bien content
Translate with GoogleYes, I recommend this product.
Helpful?
1 out of 5 stars.
Auto bilge pump
7 years ago
6 months old and auto function stopped working, It was a dry summer so it likely ran on auto 2 -3 times, when you lift the float there is nothing, but on manual it works.
Helpful?
1 out of 5 stars.
Better off with a bailer
7 years ago
On the rare occasions that the automatic float switch actually works, literally ANY piece of debris will clog up the impeller and reduce it to little more than a trickle all while draining your battery. I hate this product and will most likely rip it out and smash it with a hammer as my patience is wearing thin.
No, I do not recommend this product.
Helpful?
1 – 5 of 7 Reviews
Questions
Start typing your question and we'll check if it was already asked and answered.
1 - 3 of 3 Questions
Most helpful answers
Q: is this 12 or 24 volt
12 years ago2 Answers
A: 12 Volt
12 years agoHelpful?
Q: what are the dimensions of the pump and how do you mount it in place?
11 years ago1 Answer
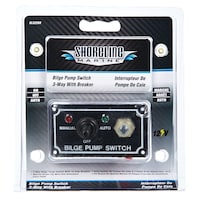
A: The dimensions are: 4" H x 51/2" L x 4 1/4" W The mounting instructions are included with the pump. PUMP MOUNTING INSTRUCTIONS WARNING: Remove the pump mounting base (See Figure 3). Failure to do this prevents the pump from starting when water is present. 1. Make sure the hull thickness is at least 1/2" thick. If not, place a block of 1/2" marine plywood (slightly larger than pump base) in the lowest part of the bilge. Be sure that the pump cover can be removed for cleaning in this position. Glue the plywood to the hull with a waterproof adhesive (epoxy, silicone adhesive, or fi berglass resin). See Figure 1. 2. Position the pump in the lowest part of the bilge on a fl at, level surface (on the plywood block if it has been installed) with the outlet pointing toward the transom. 3. Be sure outlet nozzle is level. If pointed upward or downward, an airlock may form in the pump. (See Figure 1.) 4. The fl oat end of the pump must be level with or above the pump end (See Figure 1). This prevents the pump from running out of water while the fl oat is still high enough to activate the pump. 5. Mark location of the three (3) mounting holes with a pencil or scribe. WARNING: When drilling holes do not drill through the hull! 6. Carefully drill two 1/8" diameter pilot holes in marked area and drive a screw in each hole. 7. Slide hose clamps (one to clamp hose to the pump, the other for the thru-hull connector) over end of the hose. Force hose over the discharge nozzle of the pump. Install clamp. 8. Route hose on an upward incline to the thru-hull connector. Avoid dips in hose that can trap water and airlock the pump. Avoid putting excess tension on hose, which can damage the pump outlet. 9. Force the hose over the thru-hull barbs and clamp into place. THRU-HULL CONNECTOR INSTRUCTIONS If no thru-hull connector exists, choose a location for the fi tting. 1. Position thru-hull fi ttings at least 12" above the water line to prevent water from coming back into the hull. On sailboats, mount the thru-hull high enough on the center of the transom to be above the water line at all times. 2. Place fi tting, if possible, on the same side as the steering wheel so the driver can see discharge of water when the pump is working properly. 3. Drill hole to match outside diameter of the thru-hull connector thread. 4. Place a small bead of suitable marine sealant around inside of the thru-hull connector fl ange. WARNING: Do not allow sealants containing acetic acid (smells like vinegar) such as silicone rubber sealant to contact the plastic pump housing or thru-hull connector. Such sealants can attack the plastic, causing the pump housing to crack, resulting in pump failure. 5. Insert thru-hull connector through the hole and tighten to hold the thru-hull connector fi rmly in place. CAUTION: Do not overtighten the nut. WIRING INSTRUCTIONS WARNING: Be certain that power source is 12-volt D.C. Higher voltage will damage the pump. 1. Using the full length of wire provided (and additional wire if necessary), connect wires to the pump as shown in the diagram. (See Figure 2.) 2. Route wires out of the way and secure them to the bulkhead to avoid pulling. 3. Using butt connectors sized for 16-gauge wire, splice fuse holder into positive lead (brown) between the battery and switch. Position fuse holder in a location that is easily accessible for changing fuses. IMPORTANT: Use fuses of the proper amperage (See Specifi cation Chart at top of sheet). WARNING: FAILURE TO PROPERLY FUSE AND MAKE THE APPROPRIATE WATERPROOF CONNECTIONS WILL VOID THE PRODUCT WARRANTY. 4. Install a Three-Way Switch (Attwood No. 7615A) that allows for automatic or manual switching modes. 5. Turn the pump on and twist the Test Knob clockwise to check operation. Feed water into the pump. If output appears to be too low, check the wire connections. Reversed connections result in opposite impeller rotation that drastically reduces capacity and can cause premature pump failure. CARE AND MAINTENANCE Occasionally check your pump to be certain debris is not jamming the impeller and/or fl oat within the housing. Use the test knob by rotating in a clockwise direction. Careful attention will guarantee outstanding pump performance. To clean the water chamber, remove pump housing from the mounting base by pressing in tabs on sides. Lift the pump housing away. (See Figure 3.) To clean the impeller, remove the impeller guard screw and lift the impeller guard. Remove all debris that has accumulated in pump chamber and around the impeller. Ensure that all debris is removed from strainer slots around the pump base. Inspect the impeller to ensure that it is fi rmly attached to shaft and is not cracked or broken. Replace impeller guard, screw, and pump housing on base. Be certain that all tabs are fully engaged. Periodically check the electrical connections to ensure they are water-resistant and mounted high and dry. Do not use household cleaners on the pump because many of them may damage the pump materials.
11 years agoHelpful?
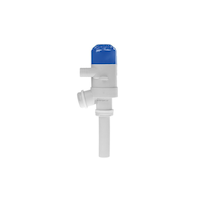
Q: Is this one has a float switch, which may let the pump run when water level are up to certain level.
11 years ago1 Answer
A: Yes this product has the automatic float switch in the base of the pump. The switch is a float that is lifted when the water level rises and then turns the mechanical switch into the on position. When the water level drops the switch moves to the off position and turns the pump off.
11 years agoHelpful?


